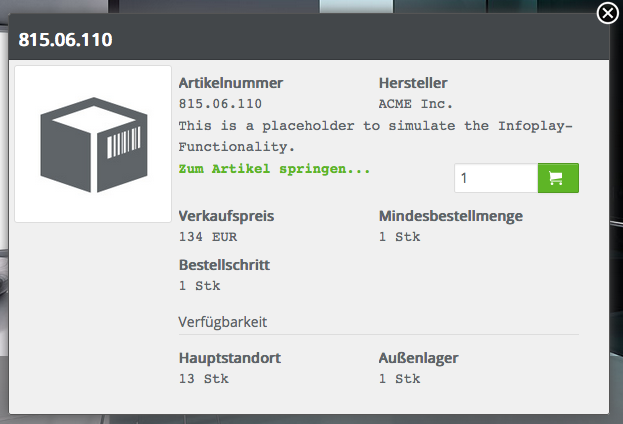
Infoplay is an item-based integration of your data. Here’s an example of how this could look like: Infoplay for instance allows you to link item numbers in catalogs, descriptions and galleries to products in your shop system. Therefore, users can add items to their basket by clicking the purchase-button shown in the Infoplay dialog. That way, users don’t have to go through the hassle of searching your entire shop system for a specific item.
But the basket transfer is just one of many options you can use here. You can also effortlessly create hyperlink connections to product detail pages and more.
To use Infoplay, you’ll need two things:
You can customize Infoplay during the initialization process by passing the required functions with the help of
oxomi.init().
| Property | Functionality |
|---|---|
| infoplayItemLookup |
Allows inquiries regarding price, availability and other product data via your merchandise management
system or your shop system.
For more details, go to the section how to integrate your item information. |
| infoplayEmptyResultHandler | Will be called if the infoplayItemLookup’s search and OXOMI’s internal search don’t provide data on the chosen item number. Can be used to create a generic placeholder item for inquiries. The retrieval signature is the same as for infoplayItemLookup. Should this feature be omitted, the user sees an appropriate message. |
| infoplayBasketHandler |
Is used to place the chosen item into the shop system’s basket.
For more details, go to the section basket transfer. |
| infoplayItemHandler |
Can be used for the integration of a completely personalized Infoplay functionality.
For more details, go to the section personalized Infoplay functionality. |
oxomi.init({
    "portal": "demo",
    "infoplayItemLookup": function(infoplayObj, nextFunc) {},
    "infoplayBasketHandler": function(infoplayObj, nextFunc) {}
});
Please note: Feel free to test Infoplay 2.0 functionality with our sample data available at our “DEMO” portal. To do so, please use the item number “ST.001.A”.
All data relevant to Infoplay is provided in the following data structure. The corresponding JavaScript-object can be accessed by all Infoplay functions. The data of the objects first layerwill be filled by OXOMI’s JavaScript component.
{
    // This data will be filled by the JavaScript component
    'itemNumber': '1234.56 78',         // String
    'compactSelection': '1234.5678',    // String
    'supplierNumber': '1111',           // String
    'supplierNumbers':['1111', '1112'], // List
    'direct': null,                     // Boolean
    'catalogId': 'ABC123',              // String
    'catalogName': 'Catalog',           // String
    'pageNum': 1,                       // Number
    'visiblePageNum': 'COVER',          // String

    // This array needs to be filled by your system during the item lookup
    'items': [                          // Array
        // ...
    ]
}
The field items needs to be filled during the item
lookup. To do so, simply fill in the required item information (in form of a JavaScript object). This
property value is an array, since multiple item versions can sometimes carry the same item number.
{
    // ...

    // This array gets filled by your system during the item lookup
    'items': [                                  // Array
        {'itemNumber': '1234.5678',             // String
        'supplierName': 'ACME Ltd.'             // String
        'shortText': 'Description text',        // String
        'previewImageUrl': '/thumbnail.jpg',    // String
        'itemUrl': '/item/1234',                // String
        'features': [                           // Array
            {'title': 'Availability',           // String
             'fields': [                        // Array
                {'name': 'Main location',       // String
                 'span': false,                 // Boolean
                 'value': '50 pieces'}          // String
            ]}
        ],
        'sections': [],                         // Array
        'open': function() { ... },             // Function
        'select': function() { ... }            // Function
        }
    ]
}
| Property | Type | Description |
|---|---|---|
| itemNumber | String | Item number of the chosen item |
| supplierName | String | Name of the supplier |
| shortText | String | Description text of the chosen item |
| shortTextHTML | String | Alternative descriptive text of the selected article as HTML. If filled, this replaces
Use this object property if your item lookup
outputs special characters as encoded HTML entities (e.g. |
| quantity | String | Initial order quantity. After click on the purchase button it contains the the current order quantity from the Infoplay dialog. |
| previewImageUrl | String | Web address of a thumbnail |
| itemUrl | String | Web address of the item (e.g. in an online store) |
| features | Array |
This is where you get to personalize a dynamic section of the Infoplay dialog.
Each component is a JavaScript object that consists of the attributes
Pro tip: You can also use |
| sections | Array |
Define your own dialog sections here (analog to the
This allows you to customize the entire Infoplay dialog. If you don’t wish to use this, go ahead and
use the property |
| open | Function |
This is optional and defines the function that is executed via the “go to item” function. Alternatively,
a link to the value of itemUrl is incorporated.
|
| select | Function | Defines the function that is called once an item is chosen from a range of multiple item variants. |
| reresolve | boolean |
This value can be used if multiple item versions appear in the search results. To find a suitable
alternative, the infoplayItem function can be recalled via the matching item number and
isSelectedAlternative=true. This can also be applied to load additional data for a
particular item.
This parameter is |
| Function | Description |
|---|---|
| infoplayItem | Controls the execution of the entire Infoplay code. |
| infoplayItemHandler | Replaces (if existent) the entire integration of the Infoplay component with its own functionality. |
| infoplayItemLookup | Searches your system for information regarding an item. |
| Rendering | A multitude of functions that issue the output of the Infoplay dialog. |
| infoplayBasketHandler | Defines the course of action when the user clicks on the dialog’s order button. |
Infoplay incorporates your item’s information into OXOMI’s Portal Viewer and galleries. The incorporated item information is retrieved from your systems.
To do so, assign a function to the property value infoplayItemLookup. The value items
(of the Infoplay object) needs to be filled with your item information.
oxomi.init({
    "portal": "demo",
    "infoplayItemLookup": function(infoplayObj, nextStep) {

        // Search own web service for item information
        $.getJSON('webservice.me.ag/item/'+ infoplayObj.itemNumber,
            function(data) {

                // Incorporate your item data into
                infoplayObj.items.push({
                    'itemNumber': data.itemNumber,
                    'supplierName': data.supplierName,
                    // ...
                });

                // Call up the following function via Infoplay’s code
                nextStep(infoplayObj);
            });
    }
});
In general, you’ll retrieve information regarding your items through a web service interface. Make sure that your data comes in the required Infoplay-object data structure.
Please note: If you recorded several item numbers within a link (green dot) of a gallery, they
are passed on in form of an array in infoplayObj.itemNumbers. As always, the first
of these item numbers will appear here: infoplayObj.itemNumber. If you’d like to use the item list
feature in galleries, please make sure that your (own) web service then searches for all of the item numbers in
infoplayObj.itemNumbers. If you aren’t using this feature, feel free to ignore this suggestion.
{
    // ...
    'items': [
        {'itemNumber': '1234.5678',
        'supplierName': 'ACME Ltd.'
        'shortText': 'Description text',
        'previewImageUrl': '/thumbnail.jpg',
        'itemUrl': '/item/1234',
        'features': [
            {'fields': [{
                  'name': 'Sales price',
                  'value': '134 EUR'
                }, {
                  'name': 'Minimum order quantity',
                  'value': '1 piece'
                }, {
                  'name': 'Ordering step',
                  'value': '1 piece'
                }]
            }
        ]}
    ]
}
Please note: Don’t forget to call the function for the subsequent processing step at the end of the function you programmed. You’ll receive this callback function as a second parameter of the function call. The Infoplay object, which you processed, then needs to be passed to the subsequent function.
oxomi.init({
    "portal": "demo",
    "infoplayItemLookup": function(infoplayObj, nextStep) {

        // This is where I process the item’s information
        // ...

        // ...and call up the subsequent function at the end
        nextStep(infoplayObj);
    }
});
You can customize Infoplay so that desired items can be added to your online store’s basket via one click
on the Infoplay dialog’s purchase button. To do so, you’ll have to define your specific function and assign it
to the property value infoplayBasketHandler.
oxomi.init({
    "portal": "demo",
    "infoplayBasketHandler": function(infoplayObj, nextStep) {

        // z.B.: e.g.: Redirection to add to basket
        // ...with item number and order quantity
        location.href = '/basket/add?item='+ infoplayObj.itemNumber +'&quantity=' + infoplayObj.quantity;
    }
});
The user accesses the Infoplay dialog via a context menu in the Portal Viewer. The link’s title can be changed
via the parameter infoplayMenuTitle.
Should you chose to forego the configuration of the menu title, the default text “search data for ***...” will
show up. “***” represents the selected item number and is dynamically embedded into the title via the
placeholder __text__.
oxomi.init({
    // ...
    "infoplayMenuTitle" : "Add to basket..."
});
}
oxomi.init({
    // ...
    "infoplayMenuTitle" : "I want __text__ in basket..."
});